How to setup CI/CD pipeline using GitHub Actions and AWS
This step-by-step tutorial will teach you how to implement a CI/CD pipeline using GitHub actions and deploy your code on AWS.

It is very easy to use GitHub actions to implement a CI/CD pipeline as it is Beginner friendly. This article is divided into 3 main parts.
Prerequisites:
- AWS account(admin access)
- GitHub Account
- Git installed on your local machine.
Part 1: Understanding the Buzzwords first
 The key to making sense of the title of this piece lies in understanding the terms CI/CD Pipeline, GitHub Actions, and AWS.
What is a CI/CD Pipeline?
 A CI/CD Pipeline is simply a development practice. It tries to answer this one question: How can we ship quality features to our production environment faster? In other words, how can we hasten the feature release process without compromising on quality?
The diagram below depicts a typical feature delivery cycle with or without the CI/CD pipeline.
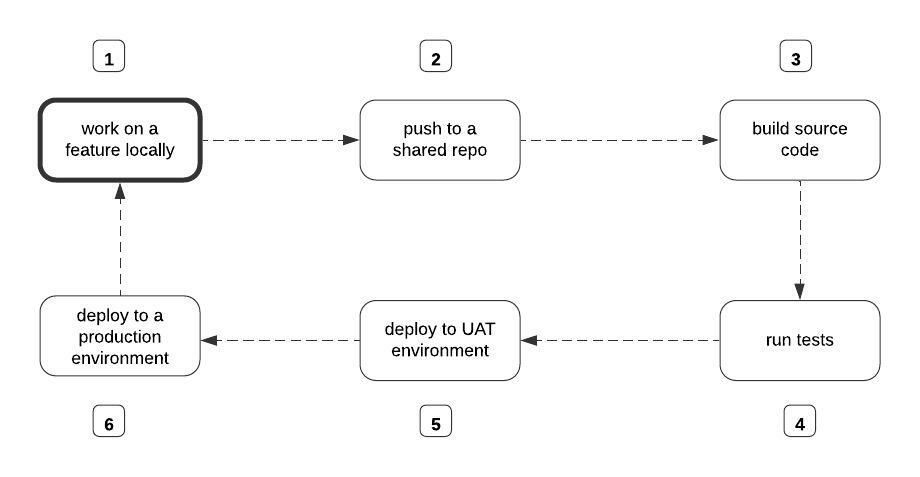
Without the CI/CD Pipeline, each step in the diagram above will be performed manually by the developer. In essence, to build the source code, someone on your team has to manually run the command to initiate the build process. Same thing with running tests and deployment.
The CI/CD approach is a radical shift from the manual way of doing things. It is entirely based on the premise that we can speed up the feature release process reasonably if we automate steps 3-6 in the diagram above.
What is the Difference between Continous Integration vs Continous Delivery vs Continous Deployment?
What are GitHub Actions?
In the CI/CD Pipeline, GitHub Actions is the entity that automates the boring stuff. Think of it as some plugin that comes bundled with every GitHub repository you create.
The plugin exists on your repo to execute whatever task you tell it to. Usually, you'd specify what tasks the plugin should execute through a YAML configuration file.
At the core of GitHub Actions lies five concepts: jobs, workflows, events, actions, and runners.
What is AWS?
 AWS stands for Amazon Web Services. It is a platform owned by Amazon, and this platform allows you access to a broad range of cloud computing services.
Cloud computing – I thought you said no big words? Most times businesses and even individual developers build applications just so other people can use them. For that reason, these applications have to be available on the interwebs.
Part 2: Continuous Integration – How to Automatically Run Builds and Tests
In this section, we will be seeing how we can configure GitHub Actions to automatically run builds and tests on push or pull request to the main branch of a repo.
I have created a demo Django project which you can grab from this repository:
git clone https://github.com/Abhishek-569/django-aws-ci-cd
After you download the code, create a virtualenv and install the requirements via pip:
pip install -r requirements.txt
Now that you have a Django project setup locally, let's configure GitHub Actions.
How to Configure GitHub Actions
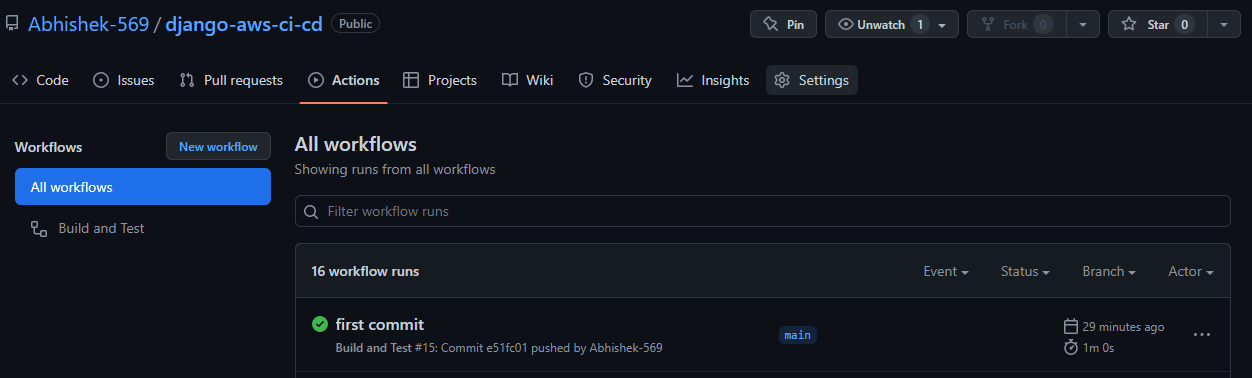
Okay, so we have our project setup. We also have a testcase written for the view that we have defined, but most importantly we've pushed our shiny change to GitHub.
The goal is to have GitHub trigger a build and run our tests each time we push or open a pull request on main/master. We just pushed our change to main, but GitHub Actions didn't trigger the build or run our tests.
Why not? Because we haven't defined a workflow yet. Remember, a workflow is where we specify the jobs we want GitHub Actions to execute.
Every GitHub repo has an tab. If you navigate to that tab, you'll know if a repo has a workflow defined on it or not.Action
Oh okay, now I get it. So how do I define a workflow on my repo?
- Create a folder named in the root of your project directory.
.github - Create a folder named in the directory: This is where you'll create all your YAML files.
workflows.github - Let's create our first workflow that will contain our build and test jobs. We do that by creating a file with a extension. Let's name this file
.ymlbuild_and_test.yml - Add the content below in the file you just created:
yaml
name: Build and Test

on:
  push:
    branches: [main]
  pull_request:
    branches: [main]

jobs:
  test:
    runs-on: ubuntu-latest

    steps:
    - name: Checkout code
      uses: actions/checkout@v2
    - name: Set up Python Environment
      uses: actions/setup-python@v2
      with:
        python-version: '3.x'
    - name: Install Dependencies
      run: |
        python -m pip install --upgrade pip
        pip install -r requirements.txt

    - name: Run Tests
      run: |
        python manage.py test
Let's make sense of each line in the file above.
name: Build and TestThis is the name of our workflow. When you navigate to the actions tab, each workflow you define will be identified by the name you give it here on that list.on:This is where you specify the events that should trigger the execution of our workflow. In our config file we passed it two events. We specified the main branch as the target branch.jobs:Remember, a workflow is just a collection of jobs.test:This is the name of the job we've defined in this workflow. You could name it anything really. Notice it's the only job and the build job isn't there? Well, it's Python code so no build step is required. This is why we didn't define the build job.runs-onGitHub provides Ubuntu Linux, Microsoft Windows, and macOS runners to run your workflows. This where you specify the type of runner you want to use. In our case, we are using the Ubuntu Linux runner.A job is made up of a series of that are usually executed sequentially on the same runner. In our file above, each step is marked by a hyphen. represents the name of the step. Each step could either be a shell script that is being executed or an . You define a step with if it's executing an or you define a step with if it's executing a shell script.
steps name action uses action run
Now that you've defined a by adding the config file in the designated folder, you can commit and push your change to your remote repo. workflow
If you navigate to the tab of your remote repo, you should see a workflow with the name Build and Test (the name which we've given it) listed there.Actions
Part 3: Continuous Delivery – How to Automatically Deploy Our Code to AWS
In this section, we will see how we can have GitHub Actions automatically deploy our code to AWS on push or pull request to the main branch. AWS offers a broad range of services. For this tutorial, we will be using a compute service called Elastic Beanstalk.
Step 1: Setup an AWS Account
create an IAM. To keep things simple, when adding permissions, just add "Administrator Access" to the user (this has some security pitfalls, though). To accomplish this, follow the steps in modules 1 and 2 of this guide.
In the end, make sure to grab and keep your AWS secret and access keys. We will be needing them in the subsequent sections.
Now that we have an AWS account properly setup, it's time to set up our Elastic Beanstalk environment.

Step 2: Setup your Elastic Beanstalk Environment
Once logged into your AWS account, take the following steps to set up your Elastic Beanstalk environment.
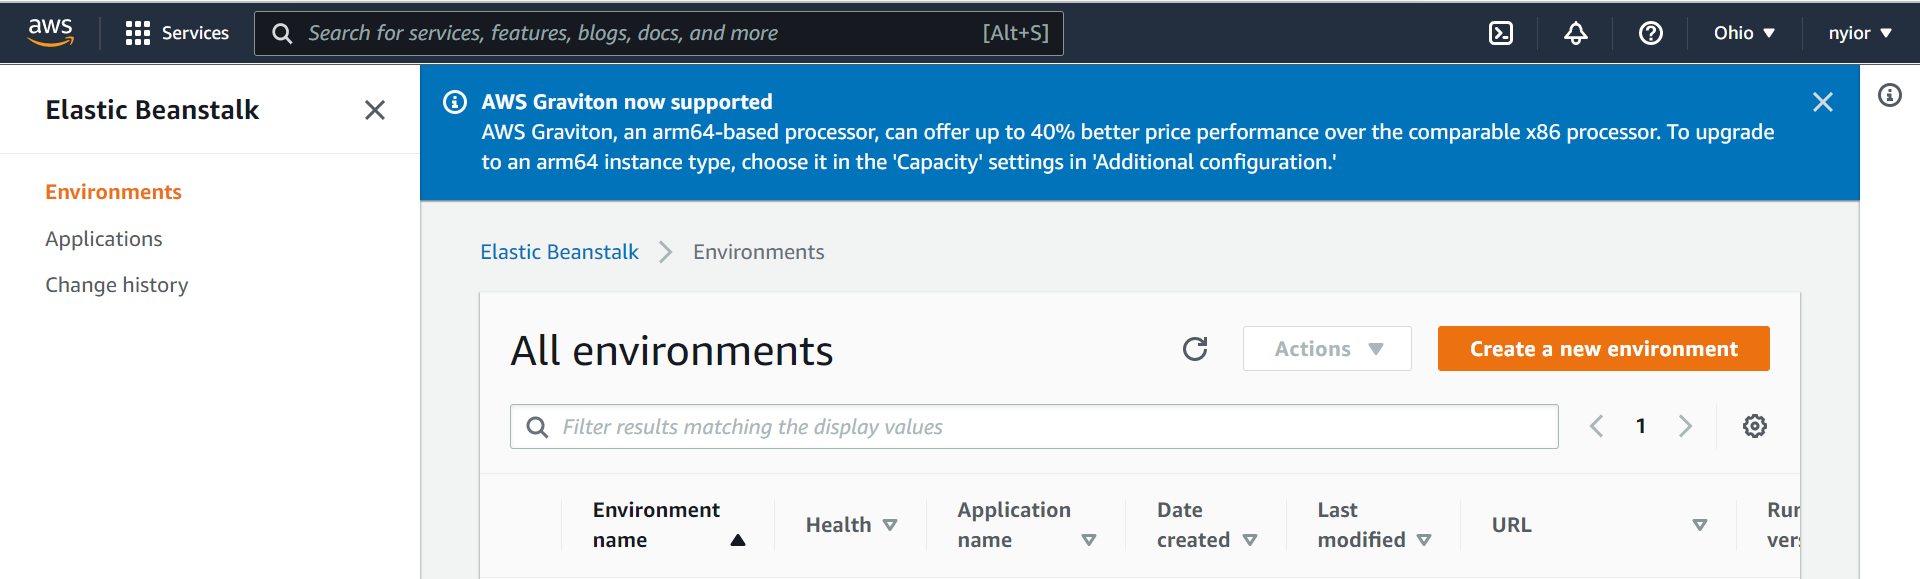
First, search for "elastic beanstalk" in the search field as shown in the image below. Then click on the Elastic Beanstalk service.
Once you click on the Elastic Beanstalk service in the previous step, you'll be taken to the page shown in the image below. On that page, click on the "Create a New Environment" prompt. Make sure to select "Web server environment" in the next step.
After selecting the "Web server environment" in the previous page you'll be taken to the page shown in the images below.
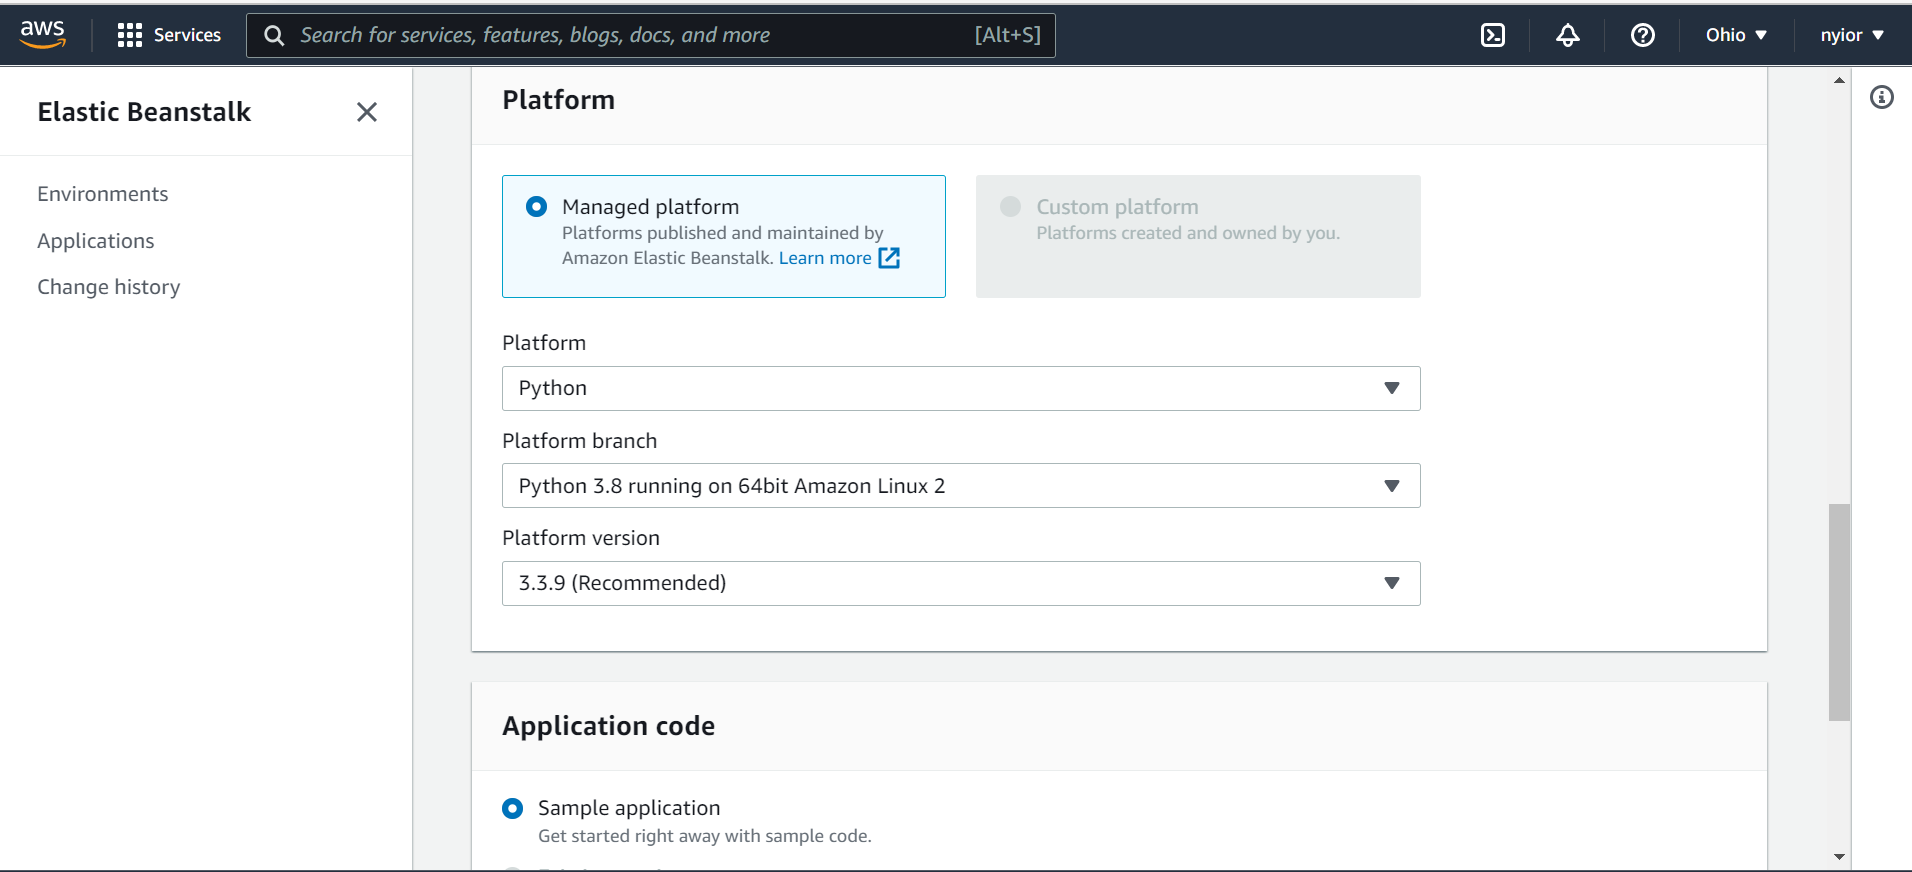
On that page, submit an application name, an environment name, and also select a platform. For this tutorial, we are going with the Python platform.
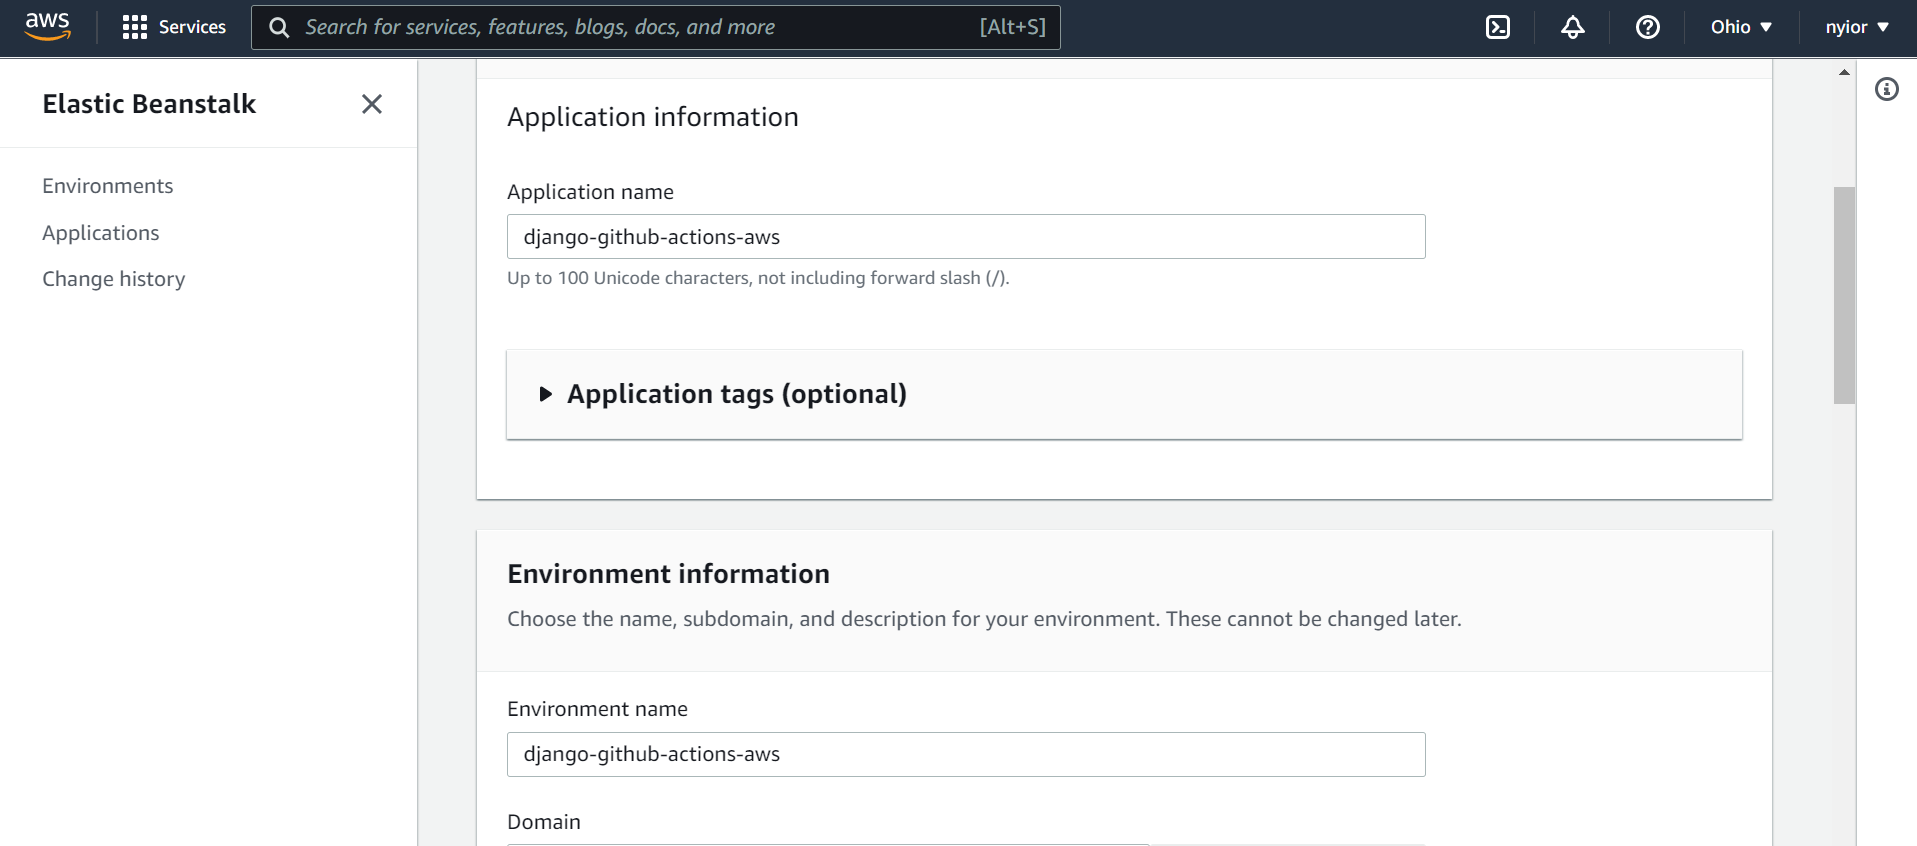
Once you submit the form filled out in the previous step, after a while your application and its associated environment will be created. You should see the names you submitted displayed on the left side bar.
Grab the application name and the environment name. We will be needing them in the subsequent steps.
Now that we have our Elastic Beanstalk environment fully setup, it's time to configure GitHub Actions to trigger automatic deployment to AWS on push or pull request to main.
Step 3: Configure your Project for Elastic Beanstalk
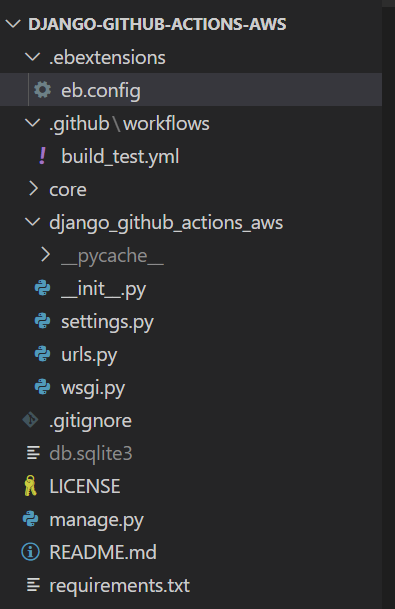
By default, Elastic Beanstalk looks for a file named in our project. It uses that file to run our application, but we don't have that file in our project. Do we? We need to tell Elastic Beanstalk to use the file in our project to run our application instead. To do that, take the following step:application.pywsgi.py
Create a folder named in your project directory. In that folder create a config file. You can name it anything you want. I named mine . Add the content below to your config file:.ebextensionseb.config
option_settings:
  aws:elasticbeanstalk:container:python:
    WSGIPath: django_github_actions_aws.wsgi:application
After completing the step above, your project directory should now look similar to the one in the image below:
One last thing you need to do in this section is to go to your file and update the setting to :settings.pyALLOWED_HOSTSall
ALLOWED_HOSTS = ['*']
Note that using the wildcard has major security drawbacks. We are only using it here for demo purposes.
Now that we are done configuring our project for Elastic Beanstalk, it's time to update our workflow file.
Step 4: Update your Workflow File
There are five important pieces of information we need to complete this step: application name, environment name, access key id, secret access key, and the server region (after login, you can grab the region from the right-most section of the navbar).
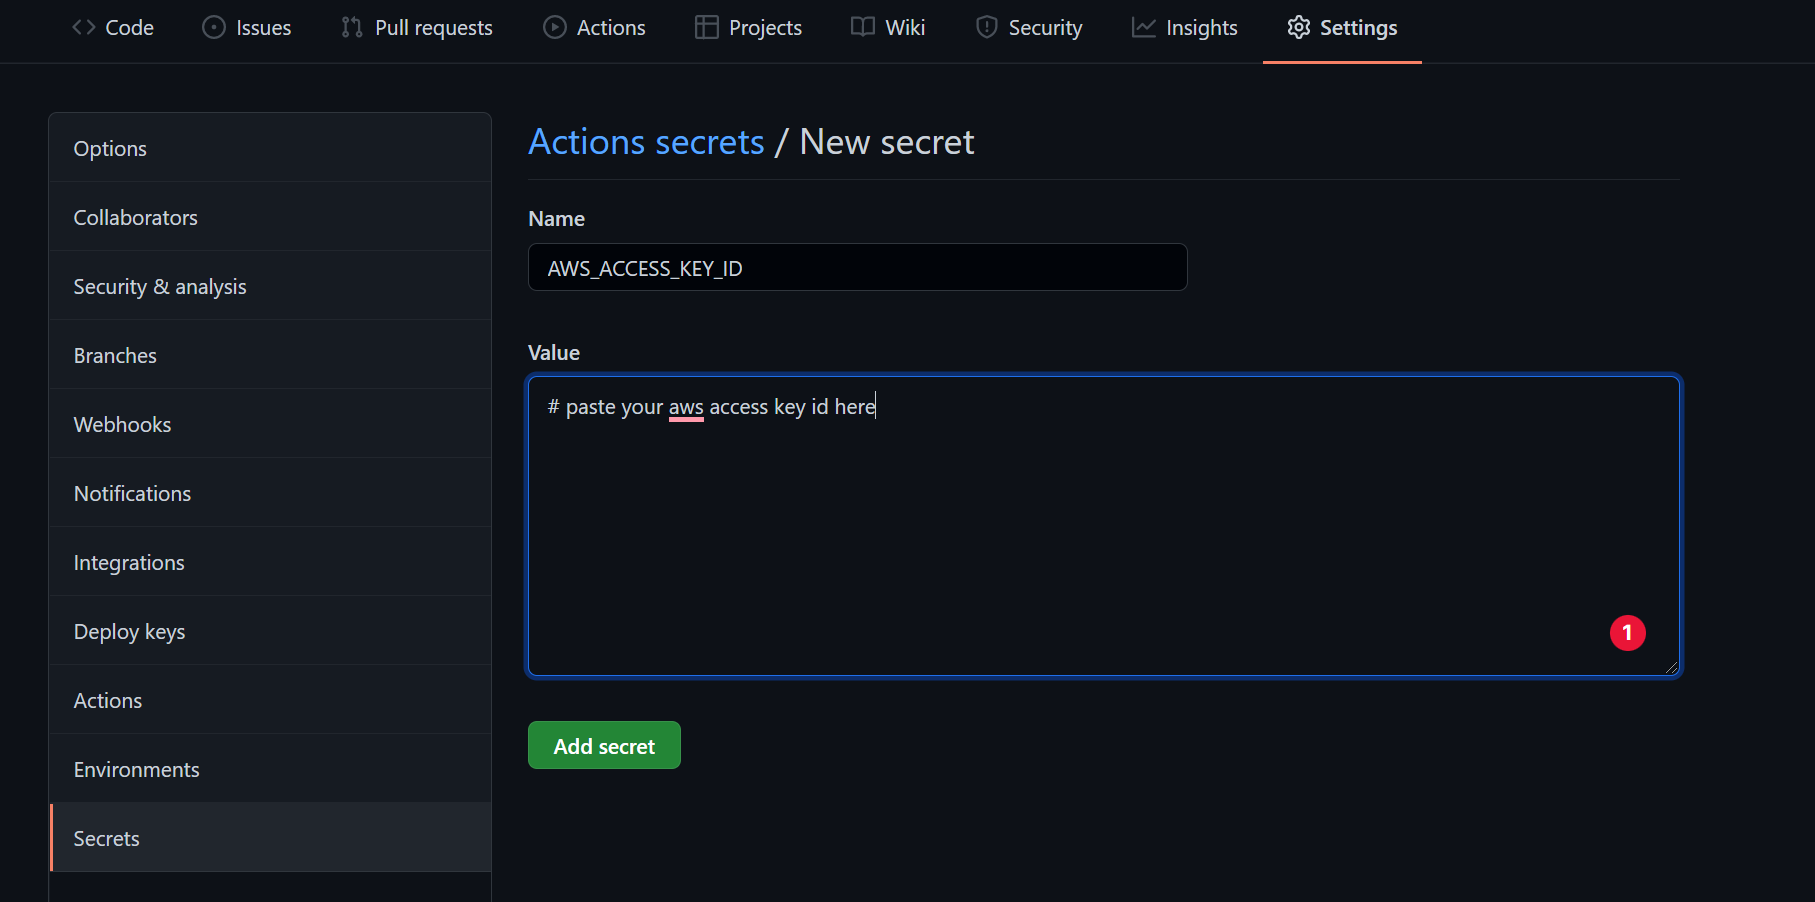
Because the access key id and the secret access key are sensitive data, we'll hide them somewhere in our repository and access them in our workflow file.
To do that, head over to the settings tab of your repo, and then click on secrets as shown in the image below. There, you can create your secrets as key-value pairs.
Next, add the deployment job to the end of your existing workflow file and now finally your workflow file will look like:
name: Build and Test

on:
  push:
    branches: [main]
  pull_request:
    branches: [main]

jobs:
  test:
    runs-on: ubuntu-latest

    steps:
      - name: Checkout code
        uses: actions/checkout@v2
      - name: Set up Python Environment
        uses: actions/setup-python@v2
        with:
          python-version: "3.x"
      - name: Install Dependencies
        run: |
          python -m pip install --upgrade pip
          pip install -r requirements.txt

      - name: Run Tests
        run: |
          python manage.py test

  deploy:
    needs: [test]
    runs-on: ubuntu-latest

    steps:
      - name: Checkout source code
        uses: actions/checkout@v2

      - name: Generate deployment package
        run: zip -r deploy.zip . -x '*.git*'

      - name: Deploy to EB
        uses: einaregilsson/beanstalk-deploy@v20
        with:
          aws_access_key: ${{ secrets.AWS_ACCESS_KEY_ID }}
          aws_secret_key: ${{ secrets.AWS_SECRET_ACCESS_KEY }}
          application_name: django-github-actions-aws
          environment_name: Djangogithubactionsaws-env
          version_label: 12353
          region: "ap-south-1"
          deployment_package: deploy.zip
Now that you've updated your workflow file locally, you can then commit and push this change to your remote. Your jobs will run and your code will be deployed to the Elastic Beanstalk instance you created. And that's it. We're done 🥳 🥳