How to set up ArgoCD in EKS?
This article explains in steps "How to set up ArgoCD" using both CLI and GUI .

As we already know the fast-paced world that we live in and everything is on-demand, we want to keep the resources in our application to match the demand. To do so we need some tools, ArgoCD is one of those.
#ArgoCD
What Is Argo CD?
Argo CD is a declarative, GitOps continuous delivery tool for Kubernetes.
Why Argo CD?
Application definitions, configurations, and environments should be declarative and version controlled. Application deployment and lifecycle management should be automated, auditable, and easy to understand.
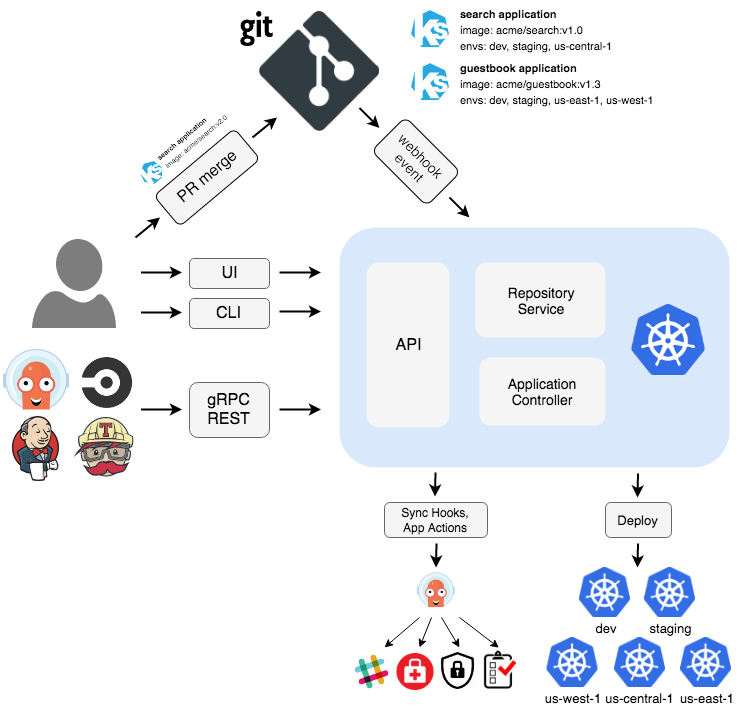
Architecture
Installing ArgoCD
Step1.
To install first we create a namespace name called argocd in our cluster to create a sperate namespace for our application.
kubectl create namespace argocd
This command creates a new namespace called Argo CD in which we will install Argo CD.
Step 2.
kubectl apply -n argocd -f https://raw.githubusercontent.com/argoproj/argo-cd/stable/manifests/install.yaml
Above command will install the Argo CD in our newly created namespace in previous command. It will install script provided by the project maintainers.
Step 3.
kubectl get pods -n argocd
To get the status of our pods in Argo CD namespace we use the above command as to check everything is functional so that we can move on to next step.
Step 4.
Get login password
Now we have to get the password to log in to our Argo CD application. Every time a new Argo CD application is created a password is also created along with it so only those authorized can only access it and create an application. This password is saved in our cluster and can be retrieved by following the command.
kubectl -n argocd get secret argocd-initial-admin-secret -o jsonpath="{.data.password}"
The above-mentioned command will get the password from our application but it is base-64 encoded which needs to be decoded. We can use only tools and websites to do so. We have used https://www.base64decode.org/ to decode our code. And the output now can be used to login to our Argo CD application either using WebUI or Argo CD CLI.
Step 5.
Port forwarding
Now we need to connect our Argo CD using AWS. As our application is not publicly exposed as it is running in a private subnet. We can use methods to connect to our application running remotely.
kubectl port-forward svc/argocd-server -n argocd 8888:443
The above command, forwards all the incoming traffic coming to localhost:8888 to a remote host to port number 443 to service ArgoCD-server running on AWS. We have used the 8888 port because it is not used by any application avoiding any conflict.

Step 6.
Login to ArgoCD using CLI
Using Argo CD CLI we have to install it first. We will use chocolatey package manager to Argo CD on windows.
choco install argocd-cli
Above command will automatically download Argo CD CLI and configure the paths in environment variable so that Argo CD CLI is accessible from any directory.
argocd login localhost:8888
We will use the above command to login using CLI. It will result in opening a prompt asking for a username and password. Username, in this case, will be admin and the password is the base-64 decoded password in Step4.

Login to ArgoCD using GUI
Now using WebUI as it is easy and beginner friendly also. We will open localhost:8888 in our browser and fill the username and password to login to our application.